> ## Documentation Index
> Fetch the complete documentation index at: https://docs.simplifi.work/llms.txt
> Use this file to discover all available pages before exploring further.
# How to Set Up a New Employee from a Sync
Simplifi can use an API Sync to create employee profiles from another data source. i.e. Payroll System or HR System etc.\
This guide helps you set up a new employee that has come through to Simplifi via a Sync
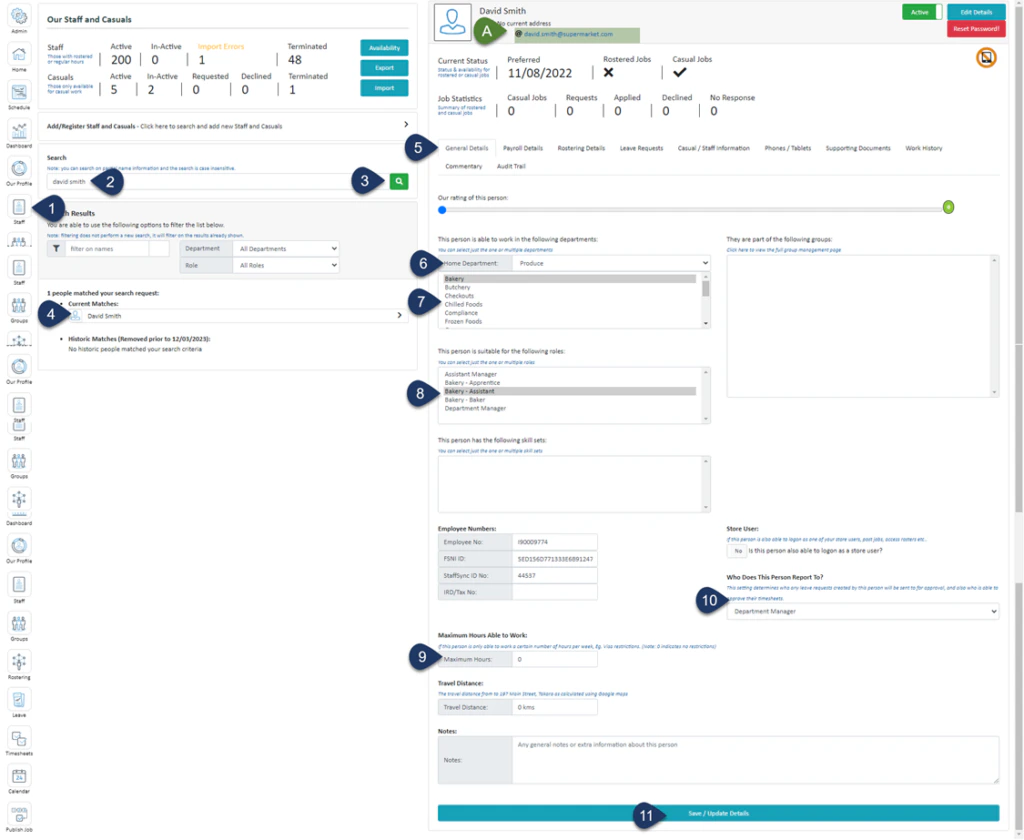 1. Click **Staff** (If you can not see this ‘Staff’ button, then you will need to ask your store administrator to grant you access)
2. Type in the name or partial name of the employee
3. Click **Search**
4. Select the **Employee**
5. Select **General Details**
6. Select the **Home Department** – (Your organisation may not be using this field – if missing, please ignore this step)
7. Select All the **Departments** this employee can work in
8. Select All the **Roles** this employee can undertake
9. If there is a Maximum Hours limit for this employee enter it here
10. Select the role this person reports to
11. Click **Save/Update Details**
**A. This is the email address this employee will need to use to log into Simplifi. If this email address is incorrect, you will need to amend it in the Data source we have Sync’d with – i.e. Payroll System, HR System etc.**\
**Simplifi will be updated with the new information in the next sync**.
1. Click **Staff** (If you can not see this ‘Staff’ button, then you will need to ask your store administrator to grant you access)
2. Type in the name or partial name of the employee
3. Click **Search**
4. Select the **Employee**
5. Select **General Details**
6. Select the **Home Department** – (Your organisation may not be using this field – if missing, please ignore this step)
7. Select All the **Departments** this employee can work in
8. Select All the **Roles** this employee can undertake
9. If there is a Maximum Hours limit for this employee enter it here
10. Select the role this person reports to
11. Click **Save/Update Details**
**A. This is the email address this employee will need to use to log into Simplifi. If this email address is incorrect, you will need to amend it in the Data source we have Sync’d with – i.e. Payroll System, HR System etc.**\
**Simplifi will be updated with the new information in the next sync**.
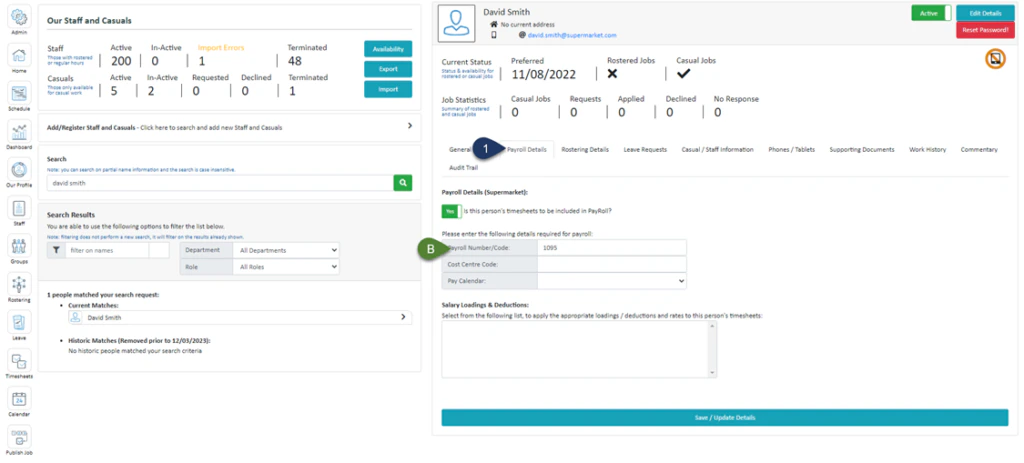 1. Select **Payroll Details**
**B. This is the Payroll ID number of this employee. When using the KIOSK to clock in, they will need to use this number. If this number is incorrect, then you will need to make the changes in the Data source we have Sync’d with – i.e. Payroll System, HR System etc.**\
**StaffSync will be updated with the new information in the next sync**.
1. Select **Payroll Details**
**B. This is the Payroll ID number of this employee. When using the KIOSK to clock in, they will need to use this number. If this number is incorrect, then you will need to make the changes in the Data source we have Sync’d with – i.e. Payroll System, HR System etc.**\
**StaffSync will be updated with the new information in the next sync**.
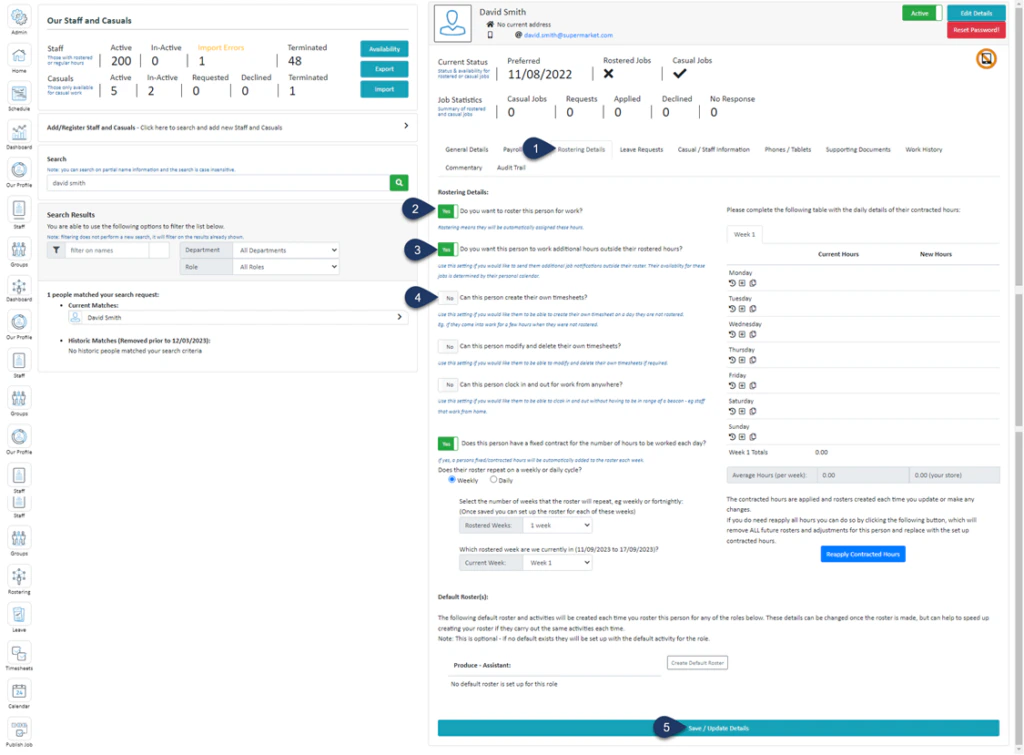 1. Select **Rostering Detail**
2. **Do you want to roster this person for work?**\
If **YES** – this employee is identified in StaffSync as **‘Staff’** and you will be able to roster them\
If **NO** – this employee is identified in StaffSync as **‘Casual’** and you will not be able to roster them, you will have to publish a job notification to them
3. **Do you want this person to work additional hours outside their rostered hours?**\
If **‘YES**‘ – this person will receive job notifications for additional shifts
4. **Can this person create their own timesheet?**\
Normally this is set as **‘YES**‘ for department managers, this allows this staff member to create a shift for themselves to work
5. Select **Save/Update Details**
1. Select **Rostering Detail**
2. **Do you want to roster this person for work?**\
If **YES** – this employee is identified in StaffSync as **‘Staff’** and you will be able to roster them\
If **NO** – this employee is identified in StaffSync as **‘Casual’** and you will not be able to roster them, you will have to publish a job notification to them
3. **Do you want this person to work additional hours outside their rostered hours?**\
If **‘YES**‘ – this person will receive job notifications for additional shifts
4. **Can this person create their own timesheet?**\
Normally this is set as **‘YES**‘ for department managers, this allows this staff member to create a shift for themselves to work
5. Select **Save/Update Details**