> ## Documentation Index
> Fetch the complete documentation index at: https://docs.simplifi.work/llms.txt
> Use this file to discover all available pages before exploring further.
# How to Publish a Job for Additional Casual Staff (via Roster)
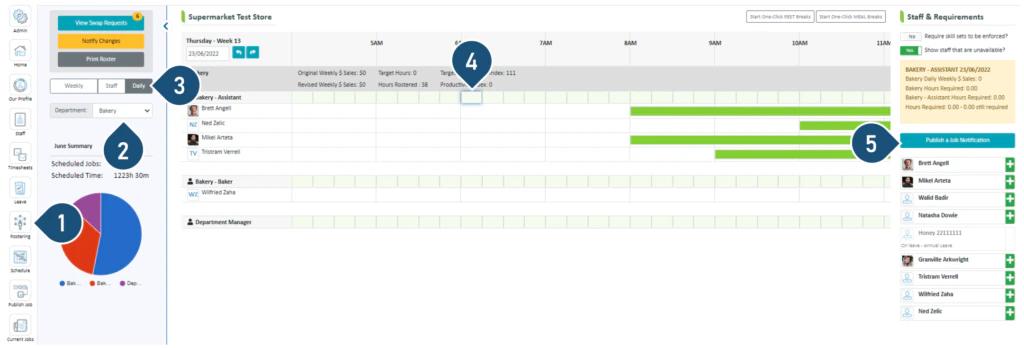 1. Select the **Rostering** button.
2. Select the Department.
3. Select the **Daily** view.
4. Click on the timeslot you wish this shift to start from e.g. 6:30 am – which is selected as the start time in the above example.
5. Click **Publish a Job Notification**. Simplifi Casual Job Publishing Wizard will now open.
1. Select the **Rostering** button.
2. Select the Department.
3. Select the **Daily** view.
4. Click on the timeslot you wish this shift to start from e.g. 6:30 am – which is selected as the start time in the above example.
5. Click **Publish a Job Notification**. Simplifi Casual Job Publishing Wizard will now open.
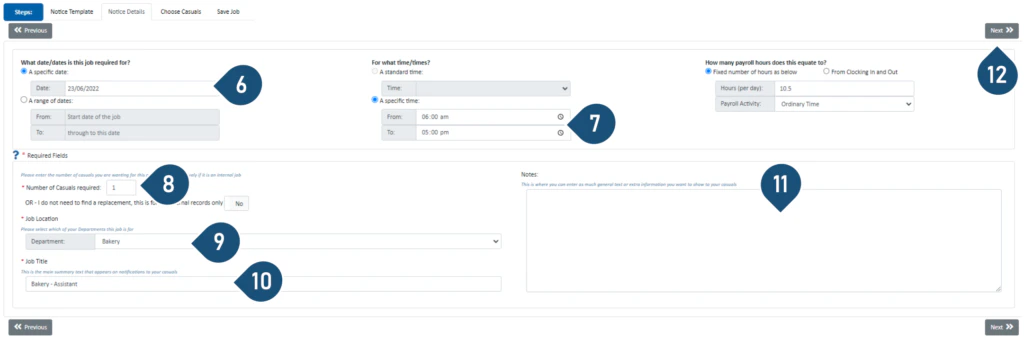 Note: Most of these fields will be pre-filled, only make changes if required
6. Click on the date field if you wish to change the date of the job.
7. Enter the shift start and finish times.
8. Enter the number of workers you require.
9. Choose the Department.
10. Overwrite if you wish to change the job title. Note: if you have changed the date of the job, make sure you change the date here as well.
11. Enter any notes you wish to publish for this job.
12. Select **Next** to proceed to the next step.
Note: Most of these fields will be pre-filled, only make changes if required
6. Click on the date field if you wish to change the date of the job.
7. Enter the shift start and finish times.
8. Enter the number of workers you require.
9. Choose the Department.
10. Overwrite if you wish to change the job title. Note: if you have changed the date of the job, make sure you change the date here as well.
11. Enter any notes you wish to publish for this job.
12. Select **Next** to proceed to the next step.
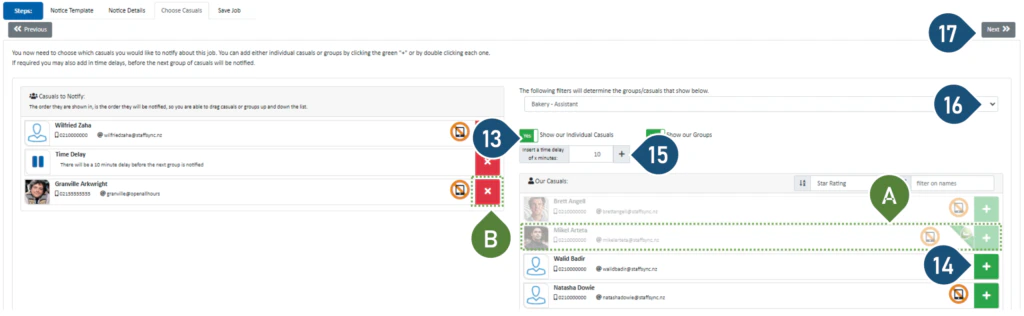 13. Switch the toggle to Yes to show individual workers to be selected.
A. If the staff member is unavailable for this shift, their details will be greyed out.
14. To select workers to publish to, click on the green + icon.
B. Click on the red x to remove a staff member or a time delay.
15. To send the job notification to additional workers at a later time, click on the grey + to add a time delay and then continue selecting the green + next to the workers you wish to notify.
16. Use the dropdown menu if you wish to publish the job to staff with other roles.
17. Click **Next** to proceed to the next step.
13. Switch the toggle to Yes to show individual workers to be selected.
A. If the staff member is unavailable for this shift, their details will be greyed out.
14. To select workers to publish to, click on the green + icon.
B. Click on the red x to remove a staff member or a time delay.
15. To send the job notification to additional workers at a later time, click on the grey + to add a time delay and then continue selecting the green + next to the workers you wish to notify.
16. Use the dropdown menu if you wish to publish the job to staff with other roles.
17. Click **Next** to proceed to the next step.
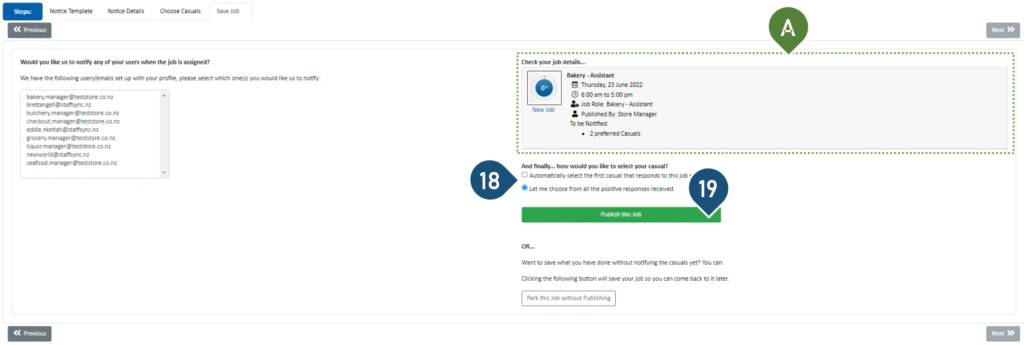 18. You have two options to choose how the successful worker will be selected. The default option is that you can choose from any of the positive responses you receive. The second option is that the system will allocate the job to the first worker that applies for the job.
C. Simply choose the option that meets your needs.
D. Check the summary of the job you are about to publish here.
19. Select Publish this job.
18. You have two options to choose how the successful worker will be selected. The default option is that you can choose from any of the positive responses you receive. The second option is that the system will allocate the job to the first worker that applies for the job.
C. Simply choose the option that meets your needs.
D. Check the summary of the job you are about to publish here.
19. Select Publish this job.