> ## Documentation Index
> Fetch the complete documentation index at: https://docs.simplifi.work/llms.txt
> Use this file to discover all available pages before exploring further.
# How to Configure a Beacon
There are two steps involved in configuring a Beacon:
1. Set up the Beacon on StaffSync and obtain a Major ID (HEX) and Minor ID (HEX).
2. Configure the Beacon using the app iBKS Config Tool.
### **Beacon Setup on OnTask**
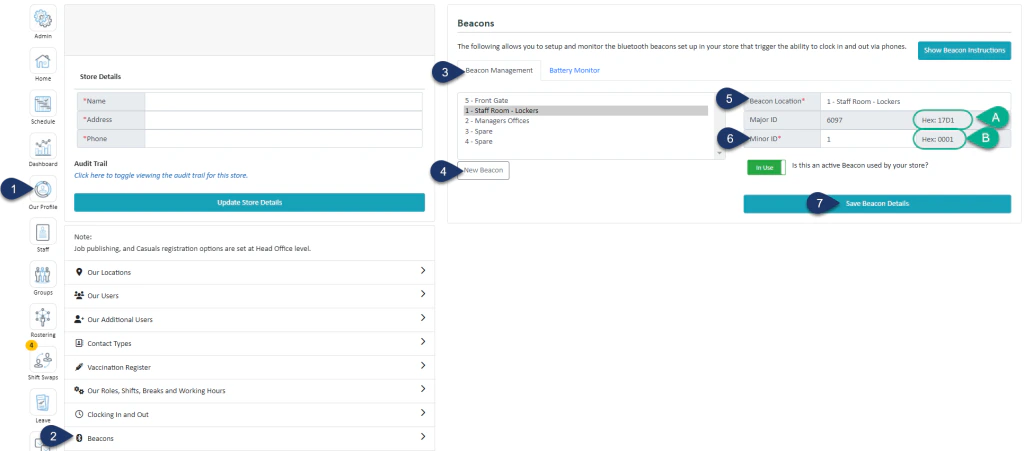 Shadow the organisation for which you wish to set up the beacon.
1. Select **Our Profile.**
2. Select **Beacons**.
3. Select **Beacon Management**.
4. Select **New Beacon**.
5. Enter the name of the beacon (it’s recommended to use the location as the name).
6. Enter a unique number for this beacon (1 – 15).
7. Select **Save Beacon Details**
**A. The Major ID (HEX) is generated. This ID is unique to the company and ensures that only employees within this company can use the beacon.**
\
**B. The Minor ID (HEX) is generated. This ID is unique to the individual beacon.**
You will need both the Major and Minor ID (HEX) for the next steps.
### **Configuring the Beacon Using the iBKS Config Tool**
You will need the **iBKS Config Tool** app for this step. It is available on both the **Apple App Store** and **Google Play Store**.
Shadow the organisation for which you wish to set up the beacon.
1. Select **Our Profile.**
2. Select **Beacons**.
3. Select **Beacon Management**.
4. Select **New Beacon**.
5. Enter the name of the beacon (it’s recommended to use the location as the name).
6. Enter a unique number for this beacon (1 – 15).
7. Select **Save Beacon Details**
**A. The Major ID (HEX) is generated. This ID is unique to the company and ensures that only employees within this company can use the beacon.**
\
**B. The Minor ID (HEX) is generated. This ID is unique to the individual beacon.**
You will need both the Major and Minor ID (HEX) for the next steps.
### **Configuring the Beacon Using the iBKS Config Tool**
You will need the **iBKS Config Tool** app for this step. It is available on both the **Apple App Store** and **Google Play Store**.
 **We recommend completing the following steps away from any other active beacons.**
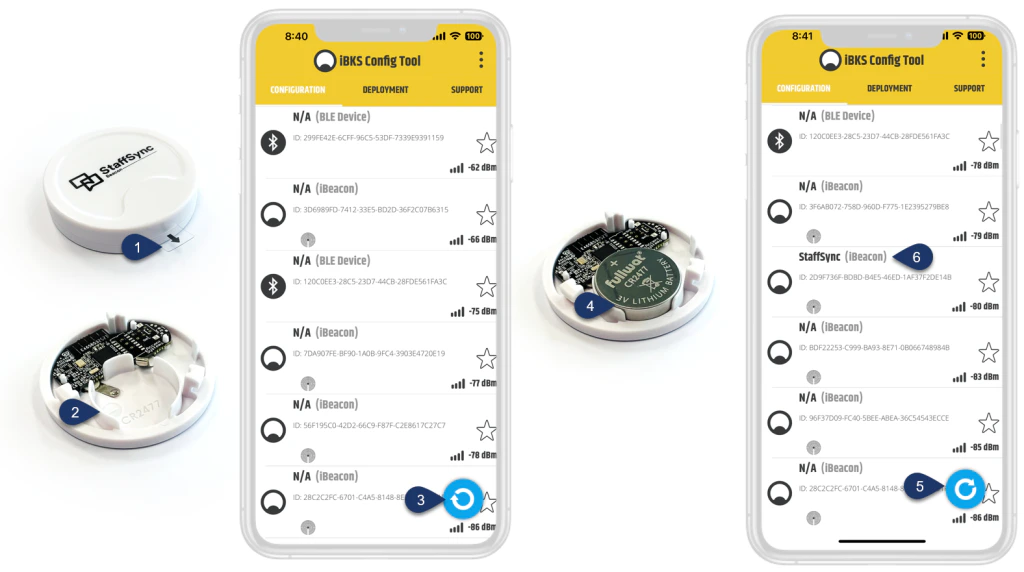 1. Remove the plastic tab from the beacon.
2. Twist and open the cap to remove the battery from the beacon.
3. This button starts and stops a search for nearby devices. If you don’t see a live list being loaded with nearby devices, then press the \*\*Sync **button on the**iBKS Config Tool \*\* to start a search.
4. Insert the battery back into the beacon as shown in the image (battery name facing up).\
Your beacon will now be discoverable on the **iBKS Config Tool**.
5. You will see a list of names appear in the app. Once you see **StaffSync**, click the **Sync** button again to stop the search.\
*(If you can’t see the name within the first 30 seconds, repeat steps 2–4.)*
6. Select **StaffSync**. (You may need to scroll down to find it again.)
1. Remove the plastic tab from the beacon.
2. Twist and open the cap to remove the battery from the beacon.
3. This button starts and stops a search for nearby devices. If you don’t see a live list being loaded with nearby devices, then press the \*\*Sync **button on the**iBKS Config Tool \*\* to start a search.
4. Insert the battery back into the beacon as shown in the image (battery name facing up).\
Your beacon will now be discoverable on the **iBKS Config Tool**.
5. You will see a list of names appear in the app. Once you see **StaffSync**, click the **Sync** button again to stop the search.\
*(If you can’t see the name within the first 30 seconds, repeat steps 2–4.)*
6. Select **StaffSync**. (You may need to scroll down to find it again.)
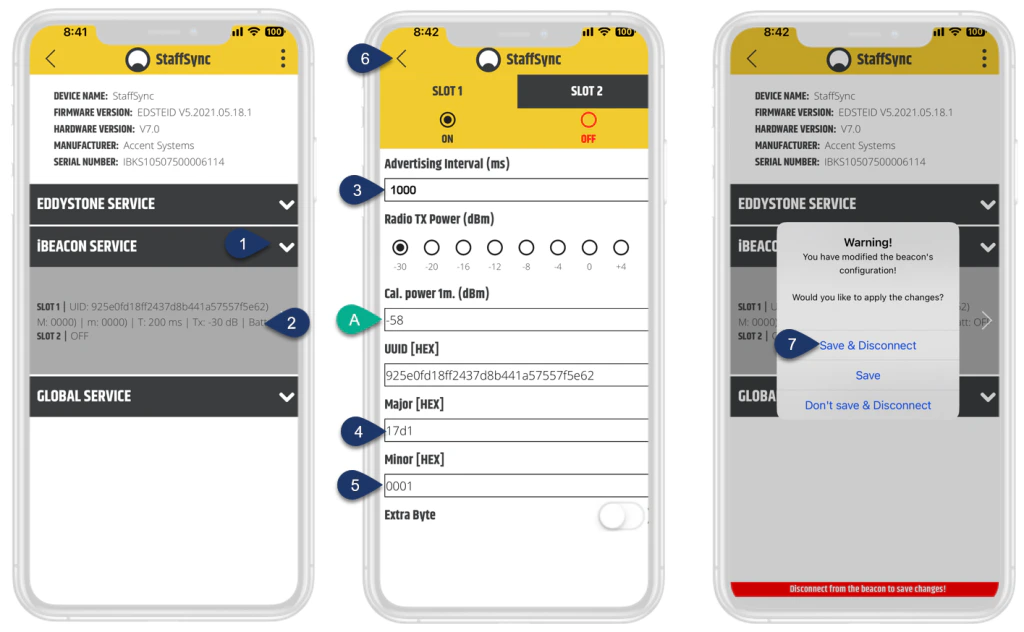 1. Select **iBeacon Services** to expand the dropdown.
2. Select the dropdown area with text.
3. Enter 1000 for the Advertising Interval
4. Enter the four-digit **Major ID (HEX)** from Step 1.
5. Enter the four-digit **Minor ID (HEX)** from Step 2.\
\
**A. Cal.power1m set at -58 – This sets the beacon’s range to 1–2 metres. Altering this value will adjust the beacon’s range.**
6. Click the back arrow twice
7. Select Save & Disconnect
1. Select **iBeacon Services** to expand the dropdown.
2. Select the dropdown area with text.
3. Enter 1000 for the Advertising Interval
4. Enter the four-digit **Major ID (HEX)** from Step 1.
5. Enter the four-digit **Minor ID (HEX)** from Step 2.\
\
**A. Cal.power1m set at -58 – This sets the beacon’s range to 1–2 metres. Altering this value will adjust the beacon’s range.**
6. Click the back arrow twice
7. Select Save & Disconnect