> ## Documentation Index
> Fetch the complete documentation index at: https://docs.simplifi.work/llms.txt
> Use this file to discover all available pages before exploring further.
# How to Add a Staff Member to a Roster
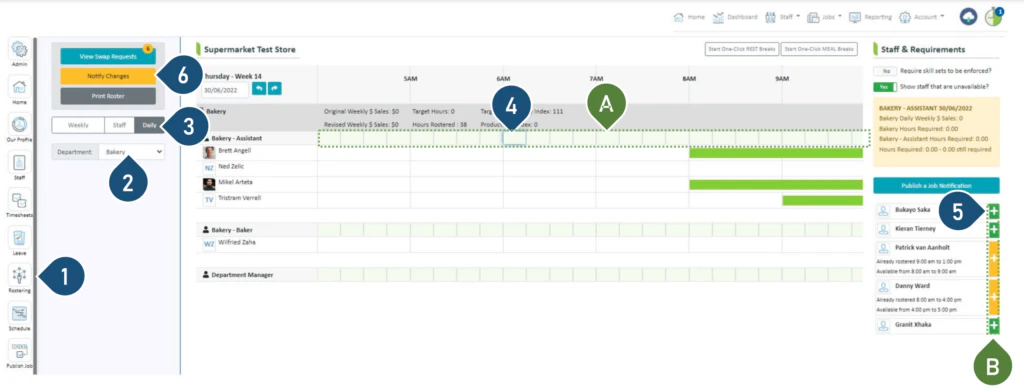 1. Select the **Rostering** button.
2. Select the Department.
3. Select the **Daily** view.
A – This bar indicates, in 15-minute blocks, the number of staff you are over or under for that role. A tick indicates you have achieved your ideal roster for that block.
4. Click on the timeslot that you wish to start this new staff member from e.g. 8:30 am is selected as the start time in the above example.
B – Green **+** indicates the staff member is available all day. Yellow + indicates the staff member is already rostered elsewhere, however, they can still be added to this roster at times they are available.
5. Click on the **+** to add the staff member to your roster.
6. Click on **Notify Changes** – StaffSync will notify the staff who have changes via push notifications on their phones.
Note: The system automatically adds the shift from your selected slot time up until you no longer need a staff member; as per the example above, 8:30am to 3:00pm. You may wish to adjust the finish time of your shift.
1. Select the **Rostering** button.
2. Select the Department.
3. Select the **Daily** view.
A – This bar indicates, in 15-minute blocks, the number of staff you are over or under for that role. A tick indicates you have achieved your ideal roster for that block.
4. Click on the timeslot that you wish to start this new staff member from e.g. 8:30 am is selected as the start time in the above example.
B – Green **+** indicates the staff member is available all day. Yellow + indicates the staff member is already rostered elsewhere, however, they can still be added to this roster at times they are available.
5. Click on the **+** to add the staff member to your roster.
6. Click on **Notify Changes** – StaffSync will notify the staff who have changes via push notifications on their phones.
Note: The system automatically adds the shift from your selected slot time up until you no longer need a staff member; as per the example above, 8:30am to 3:00pm. You may wish to adjust the finish time of your shift.